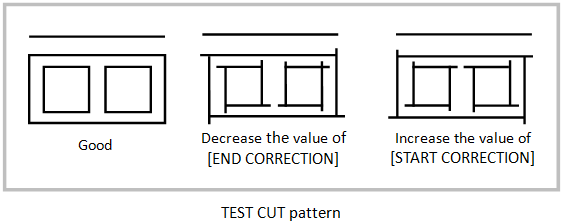
- Go to [CUT CONDITION] and check [START CORRECTION] and [END CORRECTION].
1. Select Tool [B (CUTTER)].
For details, see “SELECTING A TOOL [TOOL SELECT]” in Operation Manual.
2. Perform [TEST CUT].
See how the test cut comes out and go to [START/END CORRECTION] under
[CONDITION] and adjust the upper or lower limit of the cutter.
For details, see “SETTING CUTTING CONDITIONS [CONDITION]”
in Operation Manual.
If you make the value for [START CORRECTION] bigger, it starts to cut front side of
the starting point.
If you make the value for [END CORRECTION] smaller, it completes the cutting at
the back side of the ending point; it will make easier for you to take off the cut
object easily.

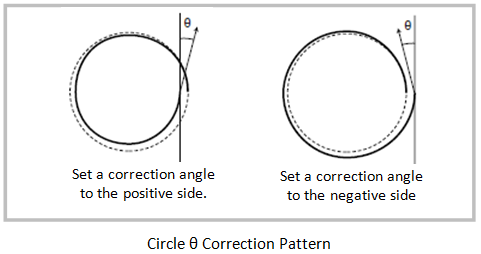
When the starting point and ending point do not meet in circle cutting:
Check [CIRCLE θ COR].
The value should vary by the thickness of the work or the degree of hardness,
thus make an adjustment to meet the size of the circle.
* If a problem occurs in R60 circle, then adjust the correction value for [50 < R < 100].
Procedure:
1) Turn [ARC θ] to [Enable] before you run the function, [CIRCLE θ COR].
2) Run the function, [CIRCLE θ COR].
For details, see “[TOOL ADJUST] > [CIRCLE θ CORRRECT]” in Operation Manual.

